Installation
Special tools required in addition to ordinary handtools :
- Spring compressor
- Disk wheel grinder
You can follow the www.240sx.org FAQ page for more help on spring installation. These instructions must be complete with a service manual or a skilled mechanics.
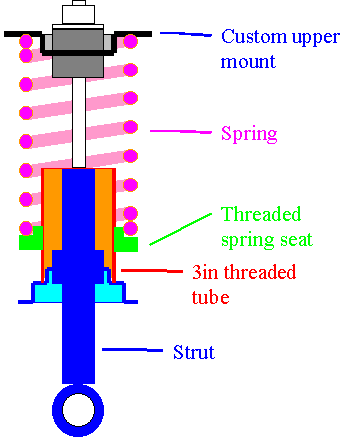
Rear
- Remove the strut assembly from the car and disassemble it.
- Install the 3in threaded tube with the threaded spring seat on the strut spring seat. Tokico struts have nice shoulder to support the 2in inner diameter tube.
- Install the spring and the upper mount with the rubber bushings and bumpstop. With the seat at the lowest setting, you don�t need a spring compressor.
- Reinstall the strut assembly on the car.
Front
Strut modification
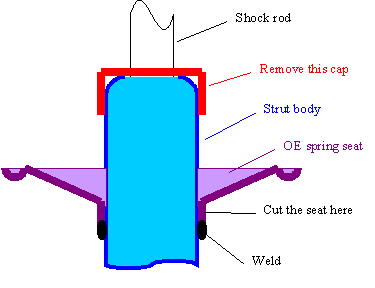
- Remove the strut assembly from the car and remove the OE spring with the spring compressor.
- Remove the finishing cap by cutting two slots on each side of it using the disk grinder. On the stock shock, this cap is for appearance only. The inner parts of the strut are held by the crimping of the strut body.
- To remove the spring seat, cut it with just over to weld using the disk grinder. Be sure to not damage the strut body.
- Grind the weld to have the strut body as a straight tube.
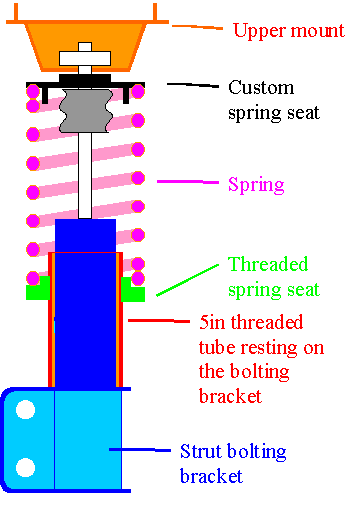
Assembly
- Insert the 5in threaded tube with seat over the strut body. The prevent noise between the tube and the strut, use silicon between the two parts.
- Put back the bumpstop, the spring, the upper seat, the lock washer the upper mount and the bolt.
- Reinstall the strut assembly on the car.
Back to Intro page
Next to Results