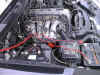
Located almost at the rear of the alternator, just below, and between it and the engine
block resides the pesky little PCV valve.
It is threaded on one end and has a hose that slips over the end that goes to the intake
manifold. The threaded end faces the front of the engine while the hose runs towards the
back of the engine and is parallel to the engine block. Look real careful with a light and
you'll find it! The parts dude at the dealer said that most people bring the valve
back when they see what they're in for. We can understand why now that we've seen it.
The job took us about 1-1/2 hrs. This was mostly due to a lot of head scratching and
shoulder shrugging on what was the best way to get to the little devil. Our procedure
follows:
* Clear the area to gain access to the PCV valve from above by:
* Removing the air ducting from the MAF to the Throttle Body.
* Disconnecting the radiator hose on the inlet connection of the thermostat housing and
the two smaller water hoses that are in the way. (Please run plenty of water to wash down
the coolant that was spilled on the ground! Animals love the sweet taste of the DEADLY
stuff!)
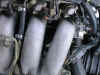
* Removing the bracket that supports the Intake manifold to the engine block. This is
located underneath and in the middle
of the manifold. 3- 14mm bolts hold it together. 2- on the manifold and 1- on the engine
block.
* Remove the hose from the PCV valve and push aside (leaving the intake side connected)
* Using a 14mm deep socket and extension:
* Maneuver the deep socket onto the PCV valve without it attached to the extension. (This
helps keep the socket on the PCV
valve while completing the next step.)
* Now it's a matter of coaxing the tools into place to remove the PCV valve. We brought
the extension and ratchet into place
from underneath the manifold.
* Installation is similar:
* Whether or not the extension is attached to the socket, maneuver the PCV valve into
place and start it with by hand. (Note: We put a bit of the latex gloves we use in the end
of the socket to keep the PCV valve sticking out the front of the socket and stay in place
until we attach the extension and ratchet.)
* Re-attach all of the hoses and air ducting.
* Install the Intake Manifold bracket. Keep the connections loose until all 3- of the
bolts have been started.
* Top off the coolant level in the radiator and bleed the air from the system.
With a bit of patience and no fear of getting dirty, we feel that this is a minor
procedure. Like we always say, "If we can do it, you shouldn't have any
problem!" For us, we have the comfort of knowing that at 130k miles, this was not a
frivolous endeavor. Going to the dealer and seeing the PCV valve and the isometric drawing
of where it's located really helped. $8 for it!
A&W
'91 s13
#2
On the SOHC the PCV valve could not be in a more accessible spot! It's at the side of the intake collector, which is the thing with ECCS imprinted on it. Took 5 mins to replace and most of the time was spent pouring water to loosen the hose.
Shawn you may want to make a note that A&W's faq is for DOHC only. They also specify that the deep socket needed is 14mm but for the SOHC it's 19mm. There's no room for the socket so it's useless anyway.. an adjustable wrench was the only tool needed and a person with strong fingers wouldn't even need that!
The valve turned out to be in fine condition and did not really need to be replaced.. oh well. Mine only had 75k on it though because I think it came with the engine I bought used.
now I need a "Powered by Fram" sticker! :)
Eric
'90 Coupe - Powered by Fram
Tips
I just spent 3.5 hours trying to get out the PCV from my '91 240. Well, Willie's
directions on the FAQ were pretty good up until the part where you have to remove the
bracket from underneath between the altenator and the intake manifold. Well, there is a
bolt in the middle that you can't get to unless you remove the altenator or at least
loosen the drive belt.. After scratching my head, I decided to attack the PCV from the top
and it was definitely easier. Here is how you can save time and major frustration:
1. Remove the intake tubing going to the air filter box from the throttle and disconnect
all hoses attached to it.
2. Remove radiator hose going to thermostat.
3. Remove the Throttle body (or put it to the left a little to gain a clearing.)
4. Drain your radiator fluid using the drain plug on the bottom drivers side on radiator.
5. Clear out all the vacuum hoses in the way. Remove the other hose attached to
thermostat. I think this goes to the heater core. Once the hose and housing are removed
you can see the PCV right under it to the left a little.
6. Remove the thermal sensor switch on the front of the engine and also the temp sensor
right next to it. (I might be wrong with the names but you will see what I mean.)
7. Get some good long needle nose pliers and push back the clip that holds the hose to PCV
and pop off the hose.
8. Get a 19mm wrench and angle it downwards to access the PCV. Remember that you are
looking at this backwards, so turn it clockwise. The clearance from removing the sensors
should give enough clearance to start turning the PCV.
9. I also could move the pcv from the bottom, but sometimes the wrench could not make a
connection due to the intake bracket being in the way. Believe me, it's a bitch removing
this. The funny thing is that when I went to the dealer and told
him what I wanted, he laughed and said that they do not replace pcv's anymore on the 240's
unless you are getting a new altenator. (hahahah...)
10. Well the reverse of these directions should get you on your way.
Don't forget to clean your throttle body and spray the intake while you are undergoing
this procedure. Might as well pull the throttle , put it on the bench and let it soak in
carb cleaner while you get to the PCV.
Geez, what a job. Hope this version helps make this job seem easier. Willie was really
scaring me with that bracket removal procedure.. He must have some awesome tools because
my 350 piece craftsman set said "NO!!!"
-=Dave
http://www.worldexpress.com/daves240sx
PCV Valve Replacement
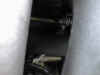
ok, here's how i see it fellas, hope this helps everybody out. if you have problems
finding the valve, stand in front of the car while its on a lift and look between the
alternator and the engine, if you can't see, it may have oil on it from changing the oil
filter. spray it with some carb cleaner, if its original, it will be grey in color. if you
don't have access to a lift, lay on the ground in front of the car, while its jacked up,
and look in the same location as mentioned before. now, trust me when i say, THIS IS THE
EASIEST WAY TO GET IT OUT.
1. remove the oil filter
2. remove the oil sending switch (located next to the fiter), unplug it first!
3. unbolt the alternator and move it aside (14 MM), DO NOT UNHOOK THE WIRING ON THE BACK
OF THE ALTERNATOR
4. remove the intake manifold bracket (this is the mount behind the alternator (14 MM)
After this you should have plenty of room to get at the valve, use a midget wrench (19 MM)
to remove the valve itself. As for special tools, i would suggest a set of shallow
metric sockets, set of extensions, swivel socket set, stubby ratchet, and a 19 mm midget
wrench. installation is reverse of removal. trust me when i say this is the easiest way to
do the job, and you won't need to buy antifreeze this way. The whole job can be done
from the bottom. have fun.
Joe Mingioni
Email: [email protected]
Where is that damn valve at?
Shawn - 95 240sx se - KA24De pix