From Salvage to Showroom
Shine—Bringing Paint Back From the Dead
CAR
CARE
BY RIK
PAUL |
From
Salvage to Showroom Shine—Bringing Paint Back From
the Dead
Pro Detailing Tips
The Latest Moves
in Detection Tech
The Ups & Downs of Tire
Pressures
New & Notable
FYI
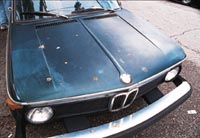
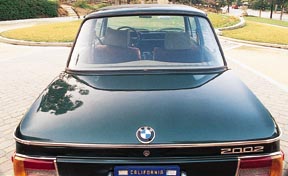
| It began with a phone
call. A friend had just bought a bargain-basement-priced
’76 BMW 2002. Although it was mechanically in good
shape, the paint job was trashed. It was badly oxidized
on the hood, trunk, and roof—with a chalky pallor and no
reflectivity left at all. Plus, the hood had deep
scratches that looked as if someone had done a break
dance on it wearing a suit of 60-grit sandpaper. Wanting
to boost the car’s curb appeal without having to resort
to the hassle and expense of repainting, my friend’s
plan was to see how much life he could breathe back into
the paint through tried-and-true finessing techniques.
With camera in tow, I followed his progress.
While this was an extreme example of deteriorated
paint, the scenario is common, even for vehicles only a
few years old. Exposure to sun and the elements starts
working on a vehicle’s paint the day it rolls off the
assembly line. Oxidation can leave it looking dull and
lifeless; acid rain, bird droppings, and other
environmental debris can produce etching and stains; and
day-to-day use can cause light scratches. All this can
make an uncared-for finish look old well before its
time—and shave hundreds of dollars off the vehicle
resale value.
The paint on the 2002 was not a factory finish; it
had been repainted (without a clear coat) and,
fortunately, none of the scratches had gone beyond the
outer coat. This is important; as long as defects don’t
go completely through the outer layer—whether clear or
color coat—they can often be finessed out. Which means
removing enough of the paint layer to take out the
defects and return the surface to a smooth, glossy
finish. This, in turn, requires the use of abrasive
cleaning compounds and, in more serious cases, wet
sanding. With the BMW, the owner—Rich LaBrie—decided to
use Meguiar’s professional line of Mirror Glaze
products, which includes cleaners of various abrasive
levels and the company’s Unigrit sandpaper, made
specifically for use on automotive finishes.
Out With the
Old...
While most light
defects can be removed with a good cleaner or rubbing
compound, for more serious problems, such as heavy
oxidation, deep scratches, or orange peel, wet sanding
is a faster method of removing paint. The typical way to
sand a finish is to begin with the least abrasive paper,
then if that’s not enough to remove the defect, move up
to increasingly more abrasive grades. Coarser papers,
however, leave behind a rougher surface, which then has
to be smoothed out with sequentially finer grades. Since
the 2002 was in such bad shape, LaBrie started with
600-grit paper to remove the dead first layer of paint
and work out the deeper scratches. Once that was
accomplished, he moved to increasingly finer paper
(1000- and 2000-grit) to smooth out the relative
roughness left by the initial grade.
Sanding an automotive finish isn’t for everyone. You
have to be careful not to remove too much paint, which
is especially easy to do around contours or corners in
the sheetmetal. 1000-grit or heavier is particularly apt
to remove paint quickly. Beginners should stick with
2000- or 1500-grit paper until they get a good feel for
the process. Unless you’re working on a very small area,
it’s advisable to wrap the paper around a sanding block,
which will elicit an even result; finger pressure alone
can create subtle waviness in the paint surface.
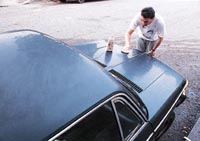
Wet sanding helps the paper last longer and generally
provides better results. To do this, halfway fill a
clean bucket with water and soak the paper in this prior
to use. In addition, it’s a good idea to keep a hose
nearby to wet the area to be sanded and allow the water
to flow over the working surface as you sand. Rinse the
paper frequently to avoid any buildup of paint particles
that can cause new, deeper scratches. As you sand, check
the surface regularly to see how the removal of the
defect is progressing; don’t remove any more paint than
necessary.
By the end of the wet sanding, the 2002 already
showed a dramatic improvement. The rough 600-grit paper
had done most of the work, taking off the heavy
oxidation and enough paint to eliminate most of the
scratches. Then, the coarseness left by the 600 was
worked out with the fine 1000- and ultrafine 2000-grit
papers, leaving only light sanding marks.
...In With the
New
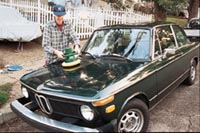
 Next, it was time
to move to the cleaners and polishes to bring back a
like-new shine. Mirror Glaze cleaners are available in
three levels of abrasiveness: heavy-, medium-, and
fine-cut. On most finishes, with light defects that
don’t require sanding, you can begin the finessing
process with one of these cleaners. As with the
sandpaper, it’s recommended to start with the least
abrasive product possible that will do the job. Locate
the worst area of the finish and choose a small section
(about 2x2 inches) to use as a test. First, go over it
with a light abrasive product and see if it’s successful
in removing the defects and smoothing the surface. If a
little more abrasive is needed, choose another product
and go over the same area with it. When you find which
level of abrasive works best, you can use that product
for similar areas, or move back to a lighter product for
areas with fewer problems. Next, it was time
to move to the cleaners and polishes to bring back a
like-new shine. Mirror Glaze cleaners are available in
three levels of abrasiveness: heavy-, medium-, and
fine-cut. On most finishes, with light defects that
don’t require sanding, you can begin the finessing
process with one of these cleaners. As with the
sandpaper, it’s recommended to start with the least
abrasive product possible that will do the job. Locate
the worst area of the finish and choose a small section
(about 2x2 inches) to use as a test. First, go over it
with a light abrasive product and see if it’s successful
in removing the defects and smoothing the surface. If a
little more abrasive is needed, choose another product
and go over the same area with it. When you find which
level of abrasive works best, you can use that product
for similar areas, or move back to a lighter product for
areas with fewer problems.
| To take out the
light sanding scratches left by the 2000-grit paper,
LaBrie chose the Heavy-Cut Cleaner. A nice advantage of
Meguiar’s cleaners is that they use “diminishing
abrasives,” which gradually become less abrasive as
they’re worked. This means that even the abrasives in
the heavy-cut cleaner gradually wear down to work as a
fine polish that leaves a smooth, glass-like surface.
The diminishing abrasives also permitted LaBrie to
move directly from the heavy-cut cleaner to an ultrafine
swirl remover to take out any haze or swirl marks left
from the cleaning and bring out a high, reflective
gloss. At this stage, he also was able to use an orbital
buffer to speed up the process and reduce the elbow
grease needed for the remaining steps.
The swirl remover produced a brilliant, glistening
finish that left onlookers following the project
awestruck by the transformation. For a final polishing
step, LaBrie opted to apply a coat of Showcar Glaze to
further nourish the paint and enhance the gloss, and
then Meguiar’s’ Medallion For All Paint protectant to
help protect the paint from environmental damage. When
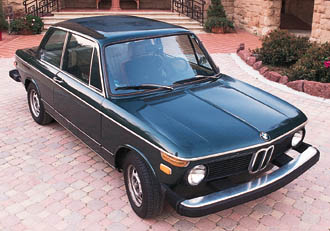
the project was finally complete, the 2002 looked like a
newly painted car with dramatically higher curb appeal,
which would probably draw a much higher price during a
resale. Meanwhile, LaBrie’s total outlay was about $100.
Overall, it was a good lesson for owners of cars with
worn paint: There may be life in that dead finish after
all.
 |